Showing posts with label Brother SE350. Show all posts

Tuesday, July 26, 2011

The 16 hand made dresses by Connie & me that were sent to Joplin, MO & Some Memory Bears Photos

These 12 pillowcase dresses were all made from Simplicity 2228 by me. They were made up to be sent to the Joplin MO area with some other dresses for the Joplin First Day (Back to school) Program around the end of July, 2011 for distribution to young ladies who recently suffered from a tragic storm disaster in their area.  


The request for girls dresses came in through ASG's Region 3's website, so 2 of our American Sewing Guild's Neighborhood Group, the Whiting Stitch Rippers, in Southern New Jersey put our sewing machines to work for another charity project.  All of the dresses that we made up are all size 7. They asked for desses in sizes 5 to 8. We choose the Pillowcase Dresses because we didn't have to worry about them being a perfect fit, because they are a loose fitting dress that will fit the girls who are extremely slender to the plus size.

For the ones below, I raided my fabric stash for most of the fabric, except for the last one, the Keliscope Dress. Picked up that fabric at JoAnn's earlier in the week, mainly for making up one of these dresses. The other fabrics came from various places and were purchased at various times. The Plaid Dress fabric came from Walmart's way back around 1994ish as indicated on the fabric's selvage.  The Green Frog fabric was an Internet/Ebay purchase about a year or so ago, with the border print on the bronz colored striped fabric a very, very recent eBay purchase.  That striped fabric was a Walmart's purchase quite awhile ago. That fabric is heavier than the other fabrics. It's more like a denim fabric.  The red and white fabric is more like a dressy satiny fabric, also a Walmart purchase from a few years ago. Added some white lace to that dress.

These dresses only required about a yard of fabric to make them up. Instead of using binding around the sleeves area, I used some of the dress fabric. Plus I made a change on the pattern. Increased the top part of the pattern about an inches to eliminate the use of binding for the ribbon caseing. Even used some of the dress fabric to make fabric straps for a couple of the dresses. Ran a horizontal row of satin stitching upwards on the dress center so the ribbons don't come out of the dresses when they are washed. Used both satin and grosgrain store-bought ribbons for the ties too. Added some wooden beads to the ends of the satin ribbons.  Used lace on one of the dresses for trim. Quite often when working with patterns, I make slight changes on the patterns. Been doing that for about 50 years or so.

************

Individual photos of the 12 dresses below from Simplicity Pattern # 2228 that I made up. That's my shower curtain used as a backdrop for the dresses...LOL

Polka Dotted Dress

Bronz & Yellow colored Striped Dress w/Border

Plaid Dress w/Border

Cranberry Floral Print

Red & White Dress w/ Lace

Sunflower Dress w/Black Background & Sunflower Border

Blue, Black & White Square Print Dress

Black Scottie Puppy Dress w/Border

Sunflower Dress w/ Cranberry Background

Lavendar Animal Print Striped Dress

Green Tree Frog w/Red Eyes Dress
For the Frog Princess?


Keliscope Print Dress


Simplicity Pattern # 2228

I made up some labels using my Print Perfect Deluxe program, The Electric Quilt Company's cotton satin injet fabric sheets, my printer and sheets of the Steam-A-Seam2 for an iorn-on self-sticking backing for the labels.  Below is a photo of the label in one of the dresses made up by another ASG member that I had added the label to her homemade Pillowcase Dresses for this project. She used a different pattern than I used that was similar to mine. She bought her fabric in JoAnns's when we were there last Wednesday, the 20th, when I had also picked up some for one of the ones I made up too. We make a trip to JoAnn's as a days outing for our ASG's sewing group, including a late lunch every once in a while.

Labels: Using Avery's business card size template, with 10 labels on an EQC's fabric sheet and Steam-A-Seam2 for the backing.

The above photo shows all 16 of the dresses that 2 of us Whiting Stitch Rippers made up that were sent to the Joplin, MO area. 4 (all blue, 1st rown running downwards) were made up using Simplicity pattern number 0460 by Connie. We actually did up all of the dresses in about 2 days.  Had mine all cut out before spending the 2 days on the sewing machine with them. The label I designed and made up for the dresses is shown on one of Connie's dresses in a close-up photo. I added the label to all 16 of the dresses before sending them out via Priority Mail.  I also took photos of Connie's 4 dresses using my shower curtain as a backdrop, too.  One of hers is different, with a red border on the bottom of it, with teh other 3 having a navy border.

Heard that there was over 1400 hand made outfits sent to Joplin, MO for the First Day Project from many, many seamstresses in the United States. Shown above are just 16 of them.

**************************************

The week before, I made up some teddy bears for Care Alternatives...


6 Memory Bears

Like my sewing machine is constantly on the go.
Even when we were having a heat wave last week.
I kept on sewing on and on. 
It was too hot to go outside.
And my air conditioner was on the go
As I sewed, ripped and stitched along...

Other Bears made up on another occassion:


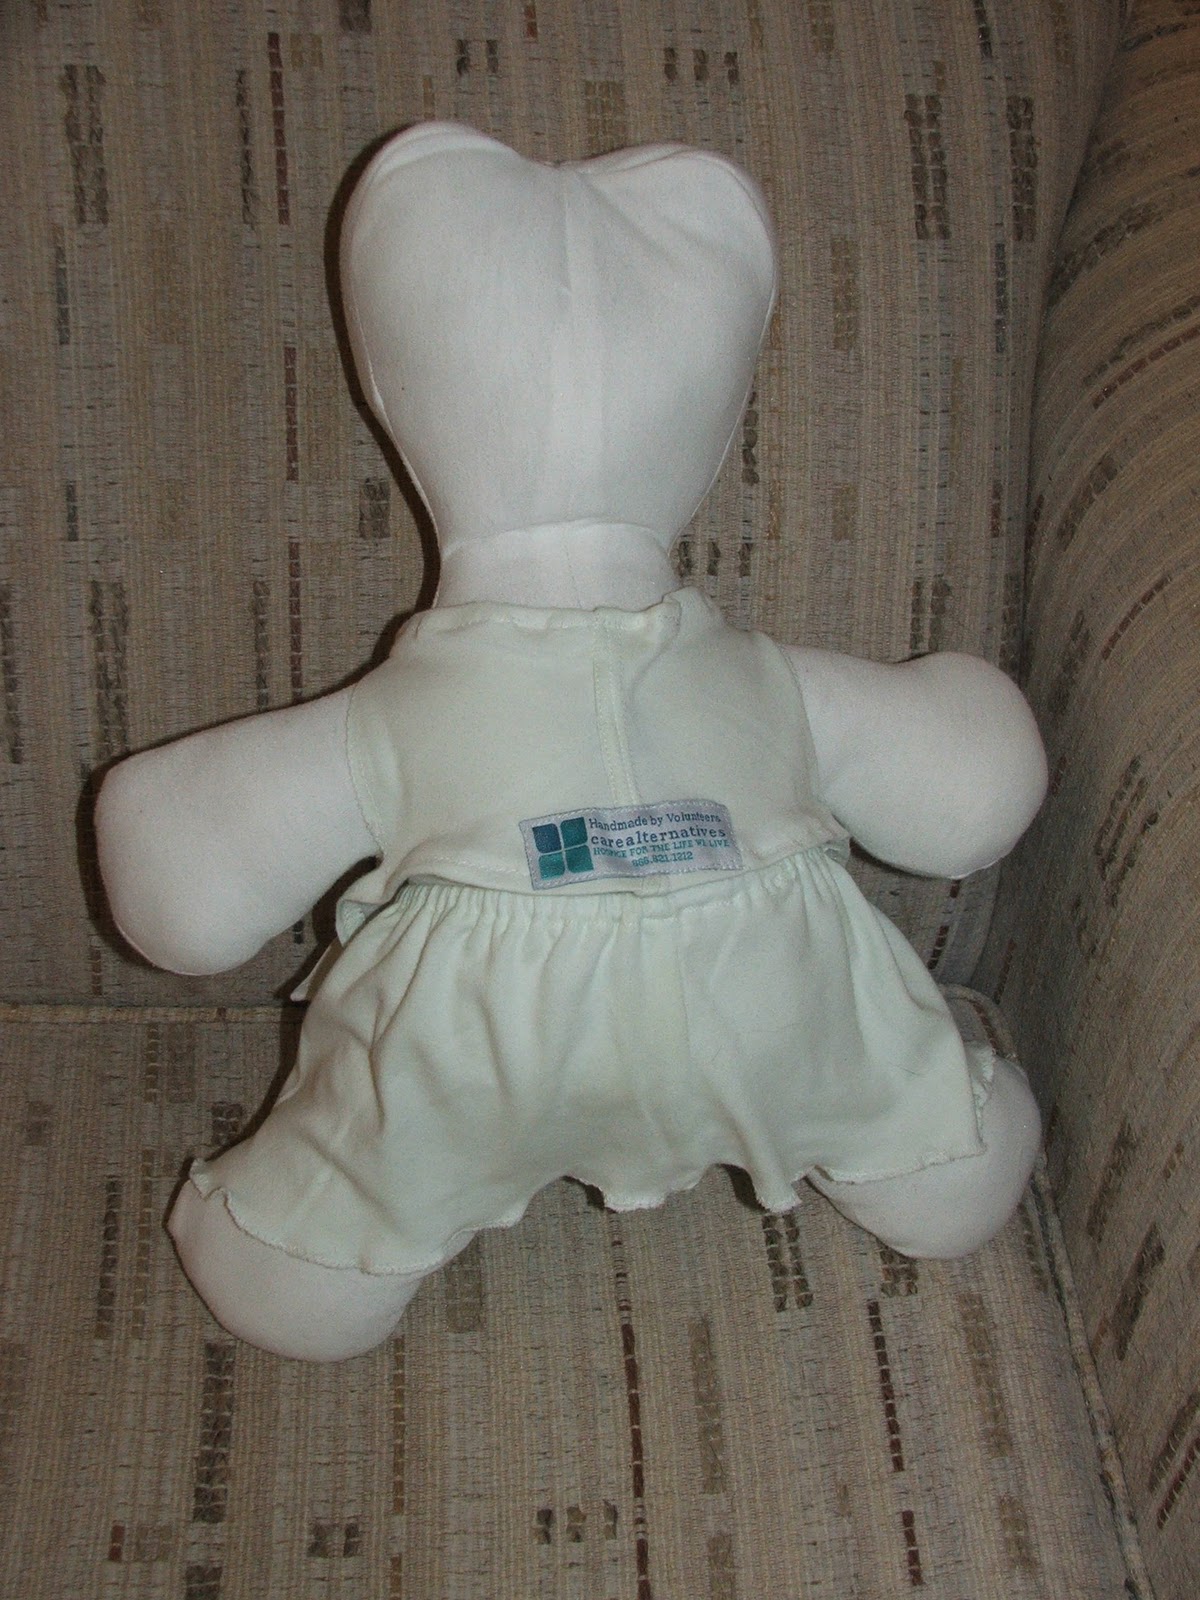
 2 Memory Bears: Added a mint green dress to the white bear from the 2 fabrics recieved for same.

8 Memory Bears: Two of these Memory Bears have T-Shirts. A special request. Made them from larger T-Shirts along with making up the bears themselves from denimum shirts.  Have done up other Memory Bears that I didn't take pictures of.

Monday, May 30, 2011

Riley Marie's First Birthday Dress in the Works - All dresses lined with white fabric...

TWO DIFFERENT VIEWS.  
Still needs buttonholes and the final touches.


 3 PRACTICE DRESSES
Using Ladybug Fabric

 Ladybug fabric, pink trim & pink buttons & white rickrack

 Ladybug fabric, 3 rows of rick rack on bottom of dress

Ladybug Fabric, contrasting bottom pannel added

PATTERN USED


McCalls # M6193 


Saturday, October 16, 2010

The Before & After: Cancer Cure Fabric Bags/Totes...


When at a recent craft show, a lady asked me if I had any water bottle bags in the Cancer Cure fabric that I had on the Wine Bottle Totes, or if I had any more of that fabric to make 2 of them up for her.

The Before: Wine Bottle Tote

I told her that all I had was what was on display on the table.  I would have to check at home and see if I had anymore of that fabric at home in my fabric stash. I suggested that she call me in a couple of days at home, which she did. It turned out that I didn't have anymore of that fabric.

I told her that I could convert 2 wine bottle totes into  2 water bottles totes for her, which I did, as shown below.

Two water bottle totes completed with attached mini totes & shoulder straps.

I cut about 5 inches off of the top of the wine bottle tote. I made  the top section  into a small tote bag. I did that by sewing across the bottom of the bag. Plus I cut the top handles off of it as seen in the photo below. Then I added some Velcro to the top part, inbetween where the old handles were as shown in the photo below.  I set the small mini tote aside .

Old handles removed & Velcro added between them.

Next, I worked on the other half of the wine bottle tote, the remaining 9 inches of it. I finished off the top of it the same way that the wine bottle tote was made except, instead of putting the pair of handle straps on it, I put a  48 inch shoulder strap on it that ran from side to side of the bag. This was completely different than the pair of handles that were on the original bag. After that, I made up a small belt that I had sewn inside the bag to hold the water bottle in place.

The small belt holding the water bottle in place.

I went back to the mini tote from the top section and did some more work on it. I added a ribbon to the mini tote that resemble the cancer cure ribbon. When doing so, I also added a button to the part of the ribbon where it crossed over.

Then, I joined the two pieces together. Now, I have a water bottle holder with a small mini tote/purse on the front of it. I completely changed the wine bottle holder into another item, the water bottle holder/tote/bag. 

The After: Completed water bottle bag with its attached mini tote.

NOTES: Actually, the mini tote section can be flipped up to cover the top of the water bottle. That is, if there is nothing in the mini tote, thus giving it another new look. If the mini purse section is left down, it could hold one of those Lazy Girl Designs Wonder Wallets  or the like.  A key chain holder can also be clipped to the shoulder strap, too, dangling on the outside of the bag.

The attached EMPTY mini tote flipped up over the top of the water bottle.

Saturday, October 9, 2010

2 Bears

Click on the photos to enlarge them. Then click on your return button to reduce them and to come back here.

Recently made up 2 Teddy Bears using McCall's Carol's Zoo Pattern number 5605. With this pattern you can make teddy bears 8 inches, 10 1/2 inches and 14 inches. The middle one, the 10 1/2 inch size is the one our ASG South Jersey Neighborhood Group, the Whiting Stitch Rippers, will be working with for making them up for the Care Alternatives hospice patients families.  The pattern is very simple and easy to work with because it only has two pattern parts to it for making up the bears.

McCall's Carol's Zoo Pattern # 5605 used for making the bears.
Only 2 pattern pieces to work with.

The way that that works, one of their representatives brings us their hospice patients garment or clothing to make the bear out of. These bears will be faceless, with NO eyes, NO nose or NO mouth or the like. After the bear is completed, they come and pick it up and give it to their hospice patients family. That simple.

I had the honor of making up the first one for our group for them. But, before making up the first one for them, I made up one with some of my own fabric from my own stash. I used a fabric that had a black background with flowers on it in two shades of pink and yellow which also had green stems and leaves on it. The flowers looked more like drawings that resembled "eggs" you might say. I gave my sample bear some eyes using an extremely large black snaps and made it a white nose out of some white knit fabric scraps.

My sample bear. 

When working with the fabric that they gave me to make up a bear from I ran into a problem. The fabric was thin and a stretch knit fabric, similar to a jersey fabric you might say. I changed my sewing needle to a ball point needle in my Brother SE350 sewing machine and still had the same problem. The fabric was getting stuck in the hole in the needle plate. Solved it by using coffee filters, the same ones I use when doing embroidery work. I doubled the coffee filters. After done sewing, I simply and gently tore them away from the back of the fabric.

 Coffee Filters used for my embroidery work


Using the coffee filers when making the bear.

Since this bear was made out of really a plain white garment, I dressed it up somewhat. Was actually given two garments to work with. The second one was an extremely light mint green. I used that one to make a heart shaped applique out of that I had sewn on the front of the white bear.


I used the front neckline part that had some lace and embroidery work on it that I incorporated into the heart shape. It still looked plain so I made a skirt and a vest from the mint green fabric, too, that are removable.

I made up my own heart shape for the applique by folding a piece of typing/computer paper in half and cutting out the heart shape which became my pattern for same.

I didn't use a pattern for the skirt or vest. All I used were strips of fabric. I sewed a 6 inch wide by about 20 inches long strip together at their shorter ends. Then formed the casting for the elastic which I inserted using a small safety pin. I just ran two rows of zig zagging across the bottom which gave the fabric a finished fuffly edging.

Dressed up white bear.
For the vest, I used another strip of fabric, a little bit shorter in length. i cut a straight line for the armholes. Tried it on the teddy bear. Then, I cut the back part in half and V'd it with the shorter part of the fabric for the top neckline area. I French seamed it back together. Then, I simply made a small hemline going around all 4 sides of it. I added a small straight frog to it for a closure. Hand sewed that onto the vest. Then, the dressed up teddy bear was finished. The rep. just loved it when she picked it up from me. Usually the teddy bears are plain without clothing on them, but, this one might keep its outfit because of it being just so simply plain. Besides putting the Care Alternatives name tag on the back of the bear, I also put one on the back of the vest.

Care Alternatives label on the back of the vest.

 The sample the rep showed us at our ASG NG meeting last month was very colorful, like my sample bear is. The fabric that the white bear is made out of is sorta stretchy, which made it a wee bit bigger than my sample bear after it was stuffed. You can see that, when the two bears are side by side.

The two stuffed bears, side by side...

Sunday, September 12, 2010

2. Buttonhole Pillow - Pocket Pillow/ Sewing it together.

You should have completed Part 1, Making the 2 squares before coming to this section. If you haven't, click here to go back there.

We are going to make French Seams that will look like Flat Felled Seams on the inside of the pillow with a row of stitching showing on the outside, about a half of an inch from JUST the top and bottom seams, but NOT on the side seams. When completed, there will be no raw seams on any of the 4 sides of the  pillow, inside  nor the outside of the pillow.

 1. With the right sides of the fabric facing outwards on both of the fabric squares,  pin  across the top and the bottom of the pillow.

2. Sew about 1/4 of a seam across the top of the pillow on the RIGHT side of the fabric. Do the same across the bottom of the fabric, too.  You are not doing anything with the sides of the pillow at this point. We are just working with the top and the bottom parts of the pillow.

3. Turn the pillow inside out to the WRONG side to now work on.  Make another seam across the top of the fabric pillow. Repeat this step across the bottom of the pillow.


4. Your pillow should look like this on both ends of the top and the bottom on the WRONG sides of the pillow. This is as far as we are going to go when we do the sides, but, we are going to go one step further on the top and the bottom of the pillow to give it extra strength for inserting the pillow and for taking  the pillow cover off of the pillow, which will be done in number 5.  At this point, the sides of the pillow should still have their raw ends untouched.


5. Make the pillow look like a tube, with working on the WRONG sides of the pillow.  Fold the loose hanging 1/2 inch seam towards the side that the button and buttonholes are on. Sew across and close to the ends of the seam.

6. Your seam should look like this on the top and the bottom of the WRONG sides. Click on the photo to enlarge it if you wish to get a better view. You can do that anytime to any of the photos to enlarge them somewhat.


7. Turn the pillow over to the RIGHT side. It should look like this going across the top and the bottom of the pillow. We are not going to do this step when we do the sides of the pillow, which are and still be raw and untouched at this point. 


8. NOW we are going to start working on the sides of the pillow. With the RIGHT sides pf the pillow up, saw a seam down the sides, about 1/4 of an inch as you had done to the top and the bottom of the pillow in number 2.


9. On the RIGHT side, open up the buttons. Turn the pillow inside out to the WRONG side through the opened button area. 


10. Check your corners. Square them off by either poking them out with a stick from the inside or GENTLY use your seam riper to do this step. 

11. After doing that step, make another row of stitches down both sides of the pillow as you did to the top and the bottom of the pillow in step number 3.


12. Both of the sides and the bottom should look like this on the WRONG sides. Click on the photo to enlarge it if you wish to see a better view of it.


13. Turn your pillow to the RIGHT side through the center button and button hole section. The RIGHT side should look like this. Enlarge the photo for a better view by clicking on it if you wish to do so.  Almost done.


14. Now, it's CLEAN UP TIME. Check to see of you have any loose threads or the like showing on the RIGHT side of the pillow. If you have any showing as I have, as showing in the above photo, GENTLY CUT THEM OFF with a pair of scissors.


15. You should have cleaned up any hanging threads and should end up with CLEAN EDGES all the way around the pillow. The pillow should look like this on the button and the buttonhole side of it. You can see that I left the pocket on this pillow because I have the pocket buttoned up. You can see that near the top of the photo, a few inches down and inwards, near the tip of the corner, near the edge of the long pointed pedal of the flower/leaves. The buttons are a brownish/green color that match the color on the insides of the pointed flowers/leaves.

16. The other side without the button or buttonholes should look like this.


17. I inserted the memory card from the funeral home of Ed  into the pocket on this card. You can more or less put anything you want into the pocket and, then button it up, if it should have a button and button hole on it. Maybe even a tooth  can even be inserted into it, for the Tooth Fairy to find? Or a special message? A love note? A holiday greeting? That is, if you left the pocket on the pillow, to make it a Pocket Pillow.


18. This is what  the button and buttonhole side would look like when the pocket is buttoned up or there is no pocket on it at all.


19. This is what the other side looks like that doesn't have the buttons or the buttonholes on it. I didn't put any name tags on it or the like because I didn't want to take away for what this one was intended for, to be used as a
"Memory Pillow" for my neighbor. This pillow was made up from one of her late/deceased husband's Hawaiian shirts that she gave me to make this pillow up from, as shown in the top storyboard photo. Ed & Marie were married for 54 years before Ed passed away in December, 2009. That is why I made up this  pillow for Marie and why it is so special for her, to cuddle up to when she goes to sleep, and for being on their Love Seat in their livingroom during the daytime. 

The idea for this pillow came from The Patchwork Cushion Cheat Pillow which a friend posted in a Yahoo craft newsletter.