Click on the photos to enlarge them. Then click on your return button to reduce them and to come back here.
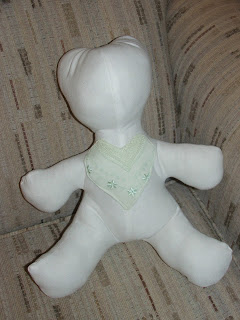
Recently made up 2 Teddy Bears using McCall's Carol's Zoo Pattern number 5605. With this pattern you can make teddy bears 8 inches, 10 1/2 inches and 14 inches. The middle one, the 10 1/2 inch size is the one our ASG South Jersey Neighborhood Group, the Whiting Stitch Rippers, will be working with for making them up for the Care Alternatives hospice patients families. The pattern is very simple and easy to work with because it only has two pattern parts to it for making up the bears.
McCall's Carol's Zoo Pattern # 5605 used for making the bears.
Only 2 pattern pieces to work with.
The way that that works, one of their representatives brings us their hospice patients garment or clothing to make the bear out of. These bears will be faceless, with NO eyes, NO nose or NO mouth or the like. After the bear is completed, they come and pick it up and give it to their hospice patients family. That simple.
I had the honor of making up the first one for our group for them. But, before making up the first one for them, I made up one with some of my own fabric from my own stash. I used a fabric that had a black background with flowers on it in two shades of pink and yellow which also had green stems and leaves on it. The flowers looked more like drawings that resembled "eggs" you might say. I gave my sample bear some eyes using an extremely large black snaps and made it a white nose out of some white knit fabric scraps.
My sample bear.
When working with the fabric that they gave me to make up a bear from I ran into a problem. The fabric was thin and a stretch knit fabric, similar to a jersey fabric you might say. I changed my sewing needle to a ball point needle in my Brother SE350 sewing machine and still had the same problem. The fabric was getting stuck in the hole in the needle plate. Solved it by using coffee filters, the same ones I use when doing embroidery work. I doubled the coffee filters. After done sewing, I simply and gently tore them away from the back of the fabric.
Coffee Filters used for my embroidery work
Using the coffee filers when making the bear.
Since this bear was made out of really a plain white garment, I dressed it up somewhat. Was actually given two garments to work with. The second one was an extremely light mint green. I used that one to make a heart shaped applique out of that I had sewn on the front of the white bear.
I used the front neckline part that had some lace and embroidery work on it that I incorporated into the heart shape. It still looked plain so I made a skirt and a vest from the mint green fabric, too, that are removable.
I made up my own heart shape for the applique by folding a piece of typing/computer paper in half and cutting out the heart shape which became my pattern for same.
I didn't use a pattern for the skirt or vest. All I used were strips of fabric. I sewed a 6 inch wide by about 20 inches long strip together at their shorter ends. Then formed the casting for the elastic which I inserted using a small safety pin. I just ran two rows of zig zagging across the bottom which gave the fabric a finished fuffly edging.
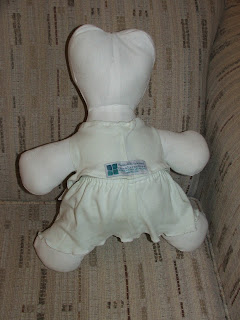
For the vest, I used another strip of fabric, a little bit shorter in length. i cut a straight line for the armholes. Tried it on the teddy bear. Then, I cut the back part in half and V'd it with the shorter part of the fabric for the top neckline area. I French seamed it back together. Then, I simply made a small hemline going around all 4 sides of it. I added a small straight frog to it for a closure. Hand sewed that onto the vest. Then, the dressed up teddy bear was finished. The rep. just loved it when she picked it up from me. Usually the teddy bears are plain without clothing on them, but, this one might keep its outfit because of it being just so simply plain. Besides putting the Care Alternatives name tag on the back of the bear, I also put one on the back of the vest.
Care Alternatives label on the back of the vest.
The two stuffed bears, side by side...


No comments:
Post a Comment