Monday, May 30, 2011

Riley Marie's First Birthday Dress in the Works - All dresses lined with white fabric...

TWO DIFFERENT VIEWS.  
Still needs buttonholes and the final touches.


 3 PRACTICE DRESSES
Using Ladybug Fabric

 Ladybug fabric, pink trim & pink buttons & white rickrack

 Ladybug fabric, 3 rows of rick rack on bottom of dress

Ladybug Fabric, contrasting bottom pannel added

PATTERN USED


McCalls # M6193 


Sunday, January 30, 2011

ASG Creativity Contest 2011 is Underway

The Simplicity pattern selections have been decided for the 2011 ASG Creativity Contest for 2011. Below is a photo of this years selection. Remember that you don't have to be an ASG member in two of the categories if you are 22 years old or younger. There's a third category that's strictly for ASG members. Like most other contest, there's a nice selection of prizes for the winners, too.


The 2011 Simplicity pattern numbers are: 2284, 2286, 2287, 2288, 2293, 2453 & 2469. Thinking of entering the contest. Picked out a couple of the patterns and already ordered them over the internet.

Our local Walmart store did away with the draws and draws of patterns when they reduced the fabric and craft departments. Miss browsing through the pattern books there. Spend a lot less time there since then.

Anyway, the 2011 sewing contest is on. Go to American Sewing Guild . Look over on the side for a list of available departments and click on the one for the contests. You'll find this one listed there along with some other ones. After getting the info and the contest entry form, you can head over to Simplicity and place your order for your own choice/choices of these patterns (and view more of their patterns online)  to get you started and on your way to creating your own look and entry into the contest if you don't have a local place for purchasing the Simplicity patterns.

I have a little bit more info on our ASG South Jersey chapters Neighborhood Groups website, the Whiting Stitch Rippers about this sewing contest if you want to check that out before going to the ASG website for the official rules and regulations and an application for same...

Friday, January 7, 2011

8 Memory Bears made up in December 2010

The ASG Stitch Rippers made up 8 Memory Bears for Care Alternatives in December 2010.

Monday, December 27, 2010

2010 December Holiday Blizzard

The snow drift in front of my walkway was close to 28 inches deep. To see more photos taken on December 27th, click here.

Sunday, November 14, 2010

My Wine Glass Holder Necklaces took first place in a 2010 national sewing contest.


Below says it all:

Dear Peggy:


Congratulations! Your National Sewing Month contest submission for a Wine Glass Necklace Holders has been chosen as the First Place Winner in the 2010 National Sewing Month Accessorize Your Life contest. The judges just loved your project! As the first place winner, you will be receiving a JoAnn Fabric & Crafts gift card, plus assorted goodies from our sponsors. Your gift package will be mailed to you within 2 weeks at the following address:

XXXXXXXXXXXXXXXX
XXXXXXXXXXXX NJ XXXXX

Congratulations again and thank you for participating in National Sewing Month.

Happy stitching!


Janice Blasko
Joyce Perhac

Sewing & Craft Alliance
http://www.sewing.org/

Margo Martin
Abby Wright

American Sewing Guild
http://www.asg.org/

For National Sewing Month
http://www.nationalsewingmonth.org/


National Sewing Month Sponsors:

V.I.P by Cranston
http://www.cranstonvillage.com/

Ghee's
http://www.ghees.com/

Kwik-Sew
http://www.kwiksew.com/

Edited

Saturday, October 16, 2010

The Before & After: Cancer Cure Fabric Bags/Totes...


When at a recent craft show, a lady asked me if I had any water bottle bags in the Cancer Cure fabric that I had on the Wine Bottle Totes, or if I had any more of that fabric to make 2 of them up for her.

The Before: Wine Bottle Tote

I told her that all I had was what was on display on the table.  I would have to check at home and see if I had anymore of that fabric at home in my fabric stash. I suggested that she call me in a couple of days at home, which she did. It turned out that I didn't have anymore of that fabric.

I told her that I could convert 2 wine bottle totes into  2 water bottles totes for her, which I did, as shown below.

Two water bottle totes completed with attached mini totes & shoulder straps.

I cut about 5 inches off of the top of the wine bottle tote. I made  the top section  into a small tote bag. I did that by sewing across the bottom of the bag. Plus I cut the top handles off of it as seen in the photo below. Then I added some Velcro to the top part, inbetween where the old handles were as shown in the photo below.  I set the small mini tote aside .

Old handles removed & Velcro added between them.

Next, I worked on the other half of the wine bottle tote, the remaining 9 inches of it. I finished off the top of it the same way that the wine bottle tote was made except, instead of putting the pair of handle straps on it, I put a  48 inch shoulder strap on it that ran from side to side of the bag. This was completely different than the pair of handles that were on the original bag. After that, I made up a small belt that I had sewn inside the bag to hold the water bottle in place.

The small belt holding the water bottle in place.

I went back to the mini tote from the top section and did some more work on it. I added a ribbon to the mini tote that resemble the cancer cure ribbon. When doing so, I also added a button to the part of the ribbon where it crossed over.

Then, I joined the two pieces together. Now, I have a water bottle holder with a small mini tote/purse on the front of it. I completely changed the wine bottle holder into another item, the water bottle holder/tote/bag. 

The After: Completed water bottle bag with its attached mini tote.

NOTES: Actually, the mini tote section can be flipped up to cover the top of the water bottle. That is, if there is nothing in the mini tote, thus giving it another new look. If the mini purse section is left down, it could hold one of those Lazy Girl Designs Wonder Wallets  or the like.  A key chain holder can also be clipped to the shoulder strap, too, dangling on the outside of the bag.

The attached EMPTY mini tote flipped up over the top of the water bottle.

Saturday, October 9, 2010

2 Bears

Click on the photos to enlarge them. Then click on your return button to reduce them and to come back here.

Recently made up 2 Teddy Bears using McCall's Carol's Zoo Pattern number 5605. With this pattern you can make teddy bears 8 inches, 10 1/2 inches and 14 inches. The middle one, the 10 1/2 inch size is the one our ASG South Jersey Neighborhood Group, the Whiting Stitch Rippers, will be working with for making them up for the Care Alternatives hospice patients families.  The pattern is very simple and easy to work with because it only has two pattern parts to it for making up the bears.

McCall's Carol's Zoo Pattern # 5605 used for making the bears.
Only 2 pattern pieces to work with.

The way that that works, one of their representatives brings us their hospice patients garment or clothing to make the bear out of. These bears will be faceless, with NO eyes, NO nose or NO mouth or the like. After the bear is completed, they come and pick it up and give it to their hospice patients family. That simple.

I had the honor of making up the first one for our group for them. But, before making up the first one for them, I made up one with some of my own fabric from my own stash. I used a fabric that had a black background with flowers on it in two shades of pink and yellow which also had green stems and leaves on it. The flowers looked more like drawings that resembled "eggs" you might say. I gave my sample bear some eyes using an extremely large black snaps and made it a white nose out of some white knit fabric scraps.

My sample bear. 

When working with the fabric that they gave me to make up a bear from I ran into a problem. The fabric was thin and a stretch knit fabric, similar to a jersey fabric you might say. I changed my sewing needle to a ball point needle in my Brother SE350 sewing machine and still had the same problem. The fabric was getting stuck in the hole in the needle plate. Solved it by using coffee filters, the same ones I use when doing embroidery work. I doubled the coffee filters. After done sewing, I simply and gently tore them away from the back of the fabric.

 Coffee Filters used for my embroidery work


Using the coffee filers when making the bear.

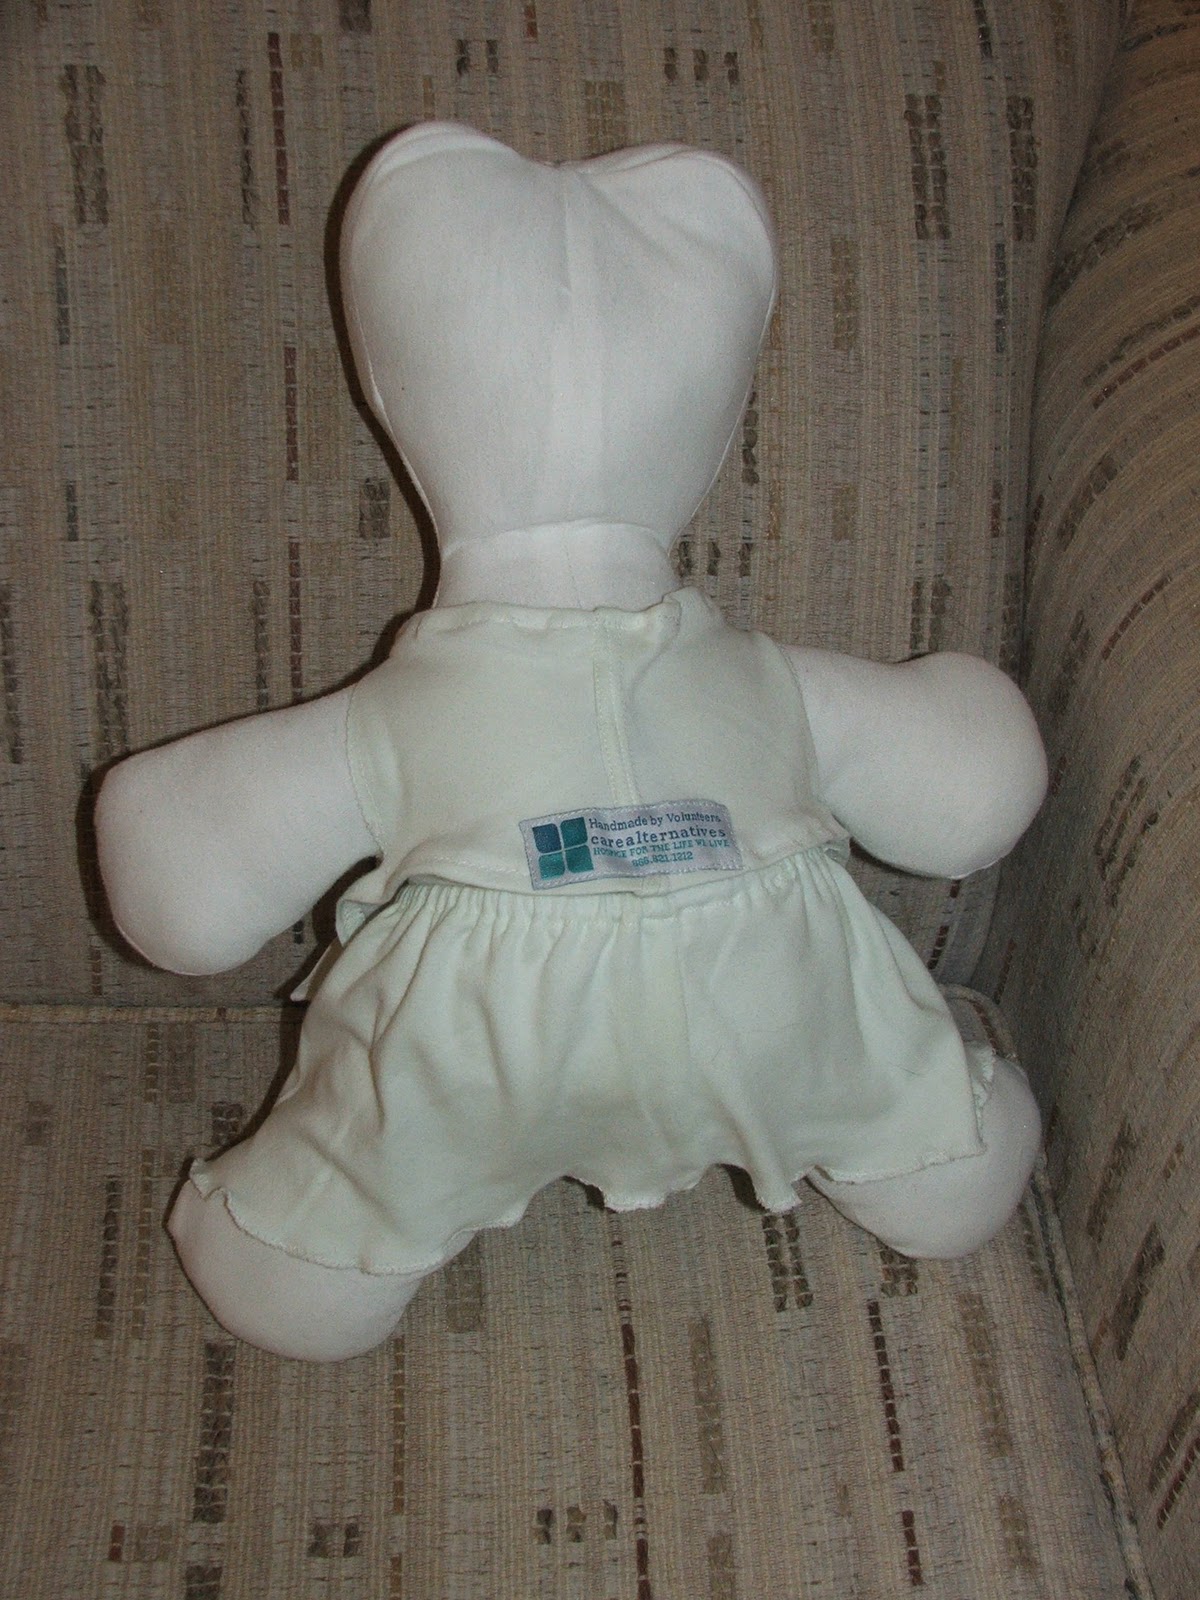
Since this bear was made out of really a plain white garment, I dressed it up somewhat. Was actually given two garments to work with. The second one was an extremely light mint green. I used that one to make a heart shaped applique out of that I had sewn on the front of the white bear.


I used the front neckline part that had some lace and embroidery work on it that I incorporated into the heart shape. It still looked plain so I made a skirt and a vest from the mint green fabric, too, that are removable.

I made up my own heart shape for the applique by folding a piece of typing/computer paper in half and cutting out the heart shape which became my pattern for same.

I didn't use a pattern for the skirt or vest. All I used were strips of fabric. I sewed a 6 inch wide by about 20 inches long strip together at their shorter ends. Then formed the casting for the elastic which I inserted using a small safety pin. I just ran two rows of zig zagging across the bottom which gave the fabric a finished fuffly edging.

Dressed up white bear.
For the vest, I used another strip of fabric, a little bit shorter in length. i cut a straight line for the armholes. Tried it on the teddy bear. Then, I cut the back part in half and V'd it with the shorter part of the fabric for the top neckline area. I French seamed it back together. Then, I simply made a small hemline going around all 4 sides of it. I added a small straight frog to it for a closure. Hand sewed that onto the vest. Then, the dressed up teddy bear was finished. The rep. just loved it when she picked it up from me. Usually the teddy bears are plain without clothing on them, but, this one might keep its outfit because of it being just so simply plain. Besides putting the Care Alternatives name tag on the back of the bear, I also put one on the back of the vest.

Care Alternatives label on the back of the vest.

 The sample the rep showed us at our ASG NG meeting last month was very colorful, like my sample bear is. The fabric that the white bear is made out of is sorta stretchy, which made it a wee bit bigger than my sample bear after it was stuffed. You can see that, when the two bears are side by side.

The two stuffed bears, side by side...